I’ve Moved!!!!!

Standard

I am all grown up now and have my own blog domain!!! Head on over to my new blog at www.latetocreate.com

You will find all the same great content with some new additions and an all new look!

Plus…you won’t lose any of the old posts.  So, link up, subscribe, like, comment….see you over there!


Easy Come … Easy Go

Standard

It is in this moment and in these days that I am reminded of the ebb and flow of life. For some reason, it seems to help me understand and explain the things that really have no reason to some people. I realize that without low moments in life, there really are no highs. Our lives are filled with both and they would lack their significance without their counterpart.

It seems like a sick joke on the eve of a very exciting milestone that I would also be contemplating the end of a life (sweet chocolate lab Cali). But in the moment that this thought crosses my mind, I realize that it was the way it was meant to be. In some ways, I would prefer to experience the joy and excitement without the opposite experience waiting in the wings. It seems that if you pay attention, this is part of the human condition.

About 17 or 18 years ago, I had noticed a nest on my patio that held three bird eggs. I closely watched it over the course of a few weeks. Until one weekend day, I woke up to find that the eggs had hatched. I crawled up on a ladder and snapped a photo. They were three cute little birds just starting their life. Later that day, I took my three year old golden retriever to the park to play frisbee. She unexpectedly died at the park with the frisbee in her mouth. After a few weeks, I developed my film and saw the photo of the baby birds. It was in that moment that I first realized the ebb and flow; easy come easy go.

It might seem like a corny story, but it is something that I often think back on when I question the ‘why’ of life. For me, it is not about ‘why’, it is just the way it is and the way it is meant to be. Do I sometimes want it different, certainly. But, I submit that I have no control over these things. All the great things in life do not exist unto themselves. They are all part of the ebb and flow.

I will remind myself of this as I walk forward into this week with great anticipation for some things and with great sadness for others. And, I am mindful of a hummingbird nest just outside my back door with a small white egg waiting to hatch.

Wendy

Easter…Hopping into town…

Standard

Easter is one of my favorite holidays.  I really have no idea why, but it is.  Maybe is because some magical bunny is supposed to come in the middle of the night and leave a basket of fun stuff.  Or, maybe it is because my mom was always so creative on Easter with the small little trinkets that can fit into an Easter basket.  It seems better than Christmas because it all had to be contained within that little basket which made the small finds even better.

The older I get, the less “stuff” I keep around to decorate for each holiday.  The reality is that I have just kept and continued to collect the things that I love rather than just a bag of “easter stuff”.  It makes each holiday worth looking forward to and makes the unpacking of all the little treasures even more fun.  So, rather than decorate my entire house, I pick several key areas and create small vignettes.  It makes it fun and challenging.

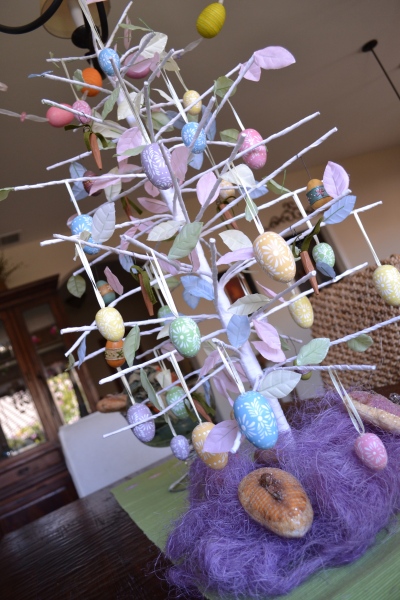
One of my favorite Easter things is this tree that my mom got for me over five years ago.  It is great with it’s painted eggs and other items I have added over time.  I kind of think every holiday should have a tree….don’t you?

Here is a closeup of the painted wood eggs.

I used the chandelier over the table to drape a cute egg garland.

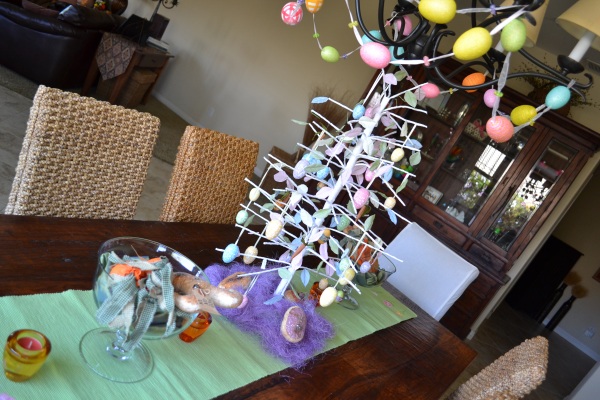
And, a few of my favorite Easter accessories.  A crunchy old rabbit and some stuffed carrots that I placed in some decorative glass bowls on either end of the spring table runner.  I even crunched up a green table napkin in the bottom for a little extra color.

A close up of the egg garland.

I added some wicker/weaved charger plates and some colored napkins to the kitchen bar in bright spring colors.  It brought a whole new life to the kitchen without much work.

Here’s a bigger view of the table.

I also spend a little time decorating the inside of my china hutch with some colored eggs placed in the vases and a little easter garland.  It really added a nice touch without much effort.

What are your Easter traditions?  What are your favorite decorations?

Hop Hop

Simple Cinnamon Rolls

Standard

I am usually a “grab a quick breakfast” kind of a girl.  I always have breakfast…you don’t want to be around me if I don’t have breakfast.  But, every once in a while I like to cook breakfast.  My two favorite breakfasts are belgian waffles (on the crispy side) and some good cinnamon rolls.  You can always go for the gooey Pillsbury ones right out of the package OR you can make these.  These are the simplified version of cinnamon rolls…there is no pastry dough here.  Here’s the instructions and recipe….

ROLLS

  • 2 1/2 Cups Bisquick
  • 1/4 Cup Granulated Sugar
  • 2/3 Cup Mill (I use skim milk)
Preheat your oven to 400 degrees.  Mix all the above in a mixing bowl.  The dough is pretty sticky…I like to use the Silpat matts to roll out the dough.  I use about a 1/4 cup more Bisquick to keep the dough from sticking to the matt.  Turn the dough out about 10 times.

Roll the dough out into a rectangle.  The actual recipe says into a 16×9 inch rectangle.  I dont’ know about you, but things don’t ROLL OUT into a RECTANGLE.  Hello!  So, I roll it out the best I can into some sort of a rectangle shape.  Maybe there is a trick to rolling it exactly into the desired shape, but I don’t have a trick for you here!  Anyways, once it is in a sort of rectangle shape, I fold the edges up and over as seen below.  You will see why in a minute.

FILLING

  • 1/4 Cup Unsalted Butter
  • 1/4 Cup Granulated Sugar
  • 1 1/4 Tsp Ground Cinnamon
Spread the melted butter onto the RECTANGLE.  Once spread out evenly, sprinkler the cinnamon sugar mix all over until it is absorbed in the butter.  You need the little dough “dams” to keep the butter from oosing everywhere.  A little trick I learned after the 10th time of having melted butter everywhere.

Once all of the filling is spread out, roll up the dough starting with the longest side.  This is a little tricky because all the sticky goodness in the inside wants to squish out.  Stick with it and roll until it is a little log.  At this point, I pinch the edges closed and then seal the flap on the leading edge of the dough.  This is sometimes tricky as the butter makes it a bit slippery.  Do your best…no one will know if it doesn’t stick.

Once you do that, slice the log into one inch slices and place them on a cookie sheet.  I like to space my rolls apart so that they get a little crispy on the edges.  If you want your rolls more gooey, place the cinnamon rolls close together (touching each other).  Scoop any excess butter/cinnamon sugar mix up and drizzle it on top of your rolls.

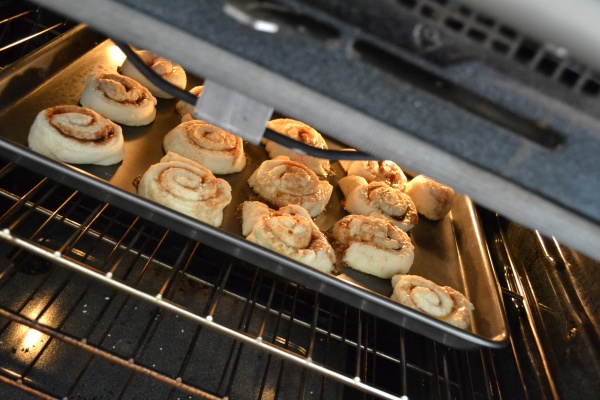
Place in the oven and cook for 12 to 15 minutes until a light brown.

I like to glaze my rolls as soon as they get out of the oven so that it melts all over.  It does make a mess in the pan though.  If you want it more neat, I would wait until they cool a bit and then add the glaze.  Mix up the following ingredients for the glaze.  You will be shocked how fast that powdered sugar is absorbed…kind of magic.

GLAZE

READY TO EAT!!!


Wishing you a wonderful day….

Color of the Year – “Tangerine Tango” (Who comes up with these names?)

Standard

So, in case you missed it, the color of the year for 2012 is Tangerine Tango.  I call it orange, but tangerine tango sounds much more sophisticated.  You can read more about it here.  You can even read about the spring fashion trends on the pantone website here.  It is kind of cool.  I am not so sure how this works…is pantone the chicken or the egg.  Do the fashion and interior designers of the world start using a certain color and then it becomes the pantone color of the year OR does Pantone select a color and THEN it is used by the designers.  I tend to think it is the former, but who the heck am I.

And, maybe I am giving it special attention because it happens to be one of my favorite colors.  So, for good measure, here is the run down of my favorite “tangerine tangos”!

Fabrics…..

Flowers…

Events….love this.

Fashion….

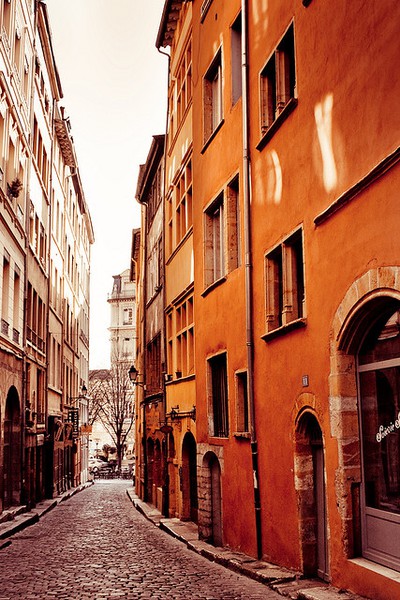
Texture & Architecture…

You can check out all of my other “tangerine” pins on my pinterest “orange and aqua” board here.  And, you will find all the links to the photos above on this board as well.


I have a new blog design coming soon and I am very excited about it.  I am also working on a few projects that I will post up soon.  Another spring quilt inspired by the jasmine in my backyard that is now in full bloom and smelling wonderful.

Have a great weekend.

Blooming Jasmine

Image

20120223-173725.jpg

It is the little things. A long stressful day at work….I notice the jasmine blooming in the backyard. So beautiful and creative in it’s own right. And, it smells so good. This may be an inspiration for my next quilt….white, fuschia and green. The photo does not do the beauty justice. Have stopped to smell the ‘roses’ today?

Spring Quilt

Standard

I started this little quilt a few weeks ago from some fabrics that were already in my stash.  The main squares in the middle of the quilt were from a stack of fabrics from Camille Roskelley.  I love the combination of the red and the light turquoise which happens to be her signature color combination.  Then, I added some other fabrics along the way for the borders.  This quilt was not pencilled out or designed before I started sewing.  Rather, I just let the fabric selection and final design come to me as I stitched.  So, we pick up the quilt here:

Measuring for the Second 6" Border

I love adding borders to quilts.  I have tried all different styles and sizes and each quilt wants a different type of border.  You just have to pull different colors out and see how they work.  And, then play with sizes.  I ended up doing three borders on this quilt.  A 2″ border in white to frame the squares in the middle.  A 4″ turquoise border and then a 6″ border in the large pink floral.  The other thing that I paid attention to is the colors that were in the quilt that I wanted to highlight.  In this case, it was the pale turquoise and pink.  Also, you will notice the scale of the print on the two border fabrics is quite different; the turquoise with a smaller scale print and the pink with a larger scale print.  I didn’t particularly plan it, but I do know that you want to change up scales of print throughout your designs.  Too many large scale prints next to each other is often offensive to the eye and too many small scale prints makes it too busy.  Rely on your eye and play with combinations.

Pinning is the Key

My tips for making sure your borders fit correctly:

  • Measure your border size using the middle of your quilt and not the ends.  If your quilt is “wonky” and not perfectly square at the corners, this will help to straighten it up.  Measure from the middle, but the border and then attach to the end of the quilt.
  • Now, if the size is not exact, you will need to stretch or bunch up the border and then pin.  You want to spread out the excess or the lack of fabric across the entire edge.  Trust me – we all create “wonky” quilts at one point or another.  The border is the trick to fixing this.  Be patient and don’t get too pissed off.
  • Pinning is the key to making sure that your borders are affixed correctly and match up end to end.
  • DO NOT measure your border at the end and then free sew.  Your quilt will be worse off…trust me.  Been there…done that.

Close Up of Front Panel

When your front panel is all done, make sure you iron really good so that it is ready to be sandwiched with the batting you have selected and the back.  I like to create the backs to my quilts so that they have a little bit of personality.  When I first started quilting, I hated doing anything on the back because I just wanted to get the quilt finished.  Now, I like to take my time so that the front and the back are just as nice.  The product of a good pressing job is that the back of your panel looks like the photo below.  Well, kind of…there are still a few seems that need to be repressed.  By the way, I hate ironing my clothes….but, I do iron my quilts.

Back of the Front Panel - The Iron is Your Friend

Then, it is off to creating the quilt sandwich:  front, batting and the back.  I always use 3M 303 spray adhesive to create the quilt sandwich.  It is the quickest and easiest way to do this…I have tried all different ways and this is my preferred method.  Then, I quilt.  I use my own Bernina to quilt all of my quilts.  I drop the feed dogs and go for it.  The next few pics show some closeups of the quilting.  I just used the standard stipple (meandering) pattern.

Quilting Close Up

sfdsdf

Quilting Close Up

And, here is the finished product.

She's All Done

Perfect Spring Quilt

Here’s a quick snapshot of the back of the quilt and my label….I wasn’t very good at labeling my quilts in the beginning.  Now, I label all of them.  You never know where they will end up (or where I will end up).

Back is Matching

This quilt is up for sale at my etsy store.  Check it out here>>>> Spring Quilt on Etsy

My next quilt is already rolling around in my head.  It has something to do with green pastures and cute sheep.  Stay Tuned!  Have a lovely day and do more of WHAT YOU LIKE!


Quilt Gift

Standard

Last weekend, I finished one of my first “commissioned” quilts.  This quilt was for a husband and dad’s 40th birthday present.  The quilt design and color was centered around the high school letter that never made it onto a jacket.  So, this inspiration guided the selection of the fabrics and the style of the quilt.  Here’s the journey from drawing to fabric to quilt:

I pencilled this quilt out a few weeks prior to get the approval of the customer.  It is always hard to get my ideas on to paper, but once I do it moves the creative process along quite quickly.  My initial design is below which I changed slightly as I purchased the fabric, worked the blocks and figured out the sizing.  I ended up going five blocks down rather than four because it just looked better to the eye.

Initial Design

One of my favorite things to add to add quilt is a border and stripes.  I never know exactly what border will look right until I get the main part of the quilt complete and have the fabrics all in front of me.  The final design with the stripes changed slightly, but they are still there.

Dimensions

I decided to start this quilt with 4 1/2″ squares when sewn together in blocks of 9 would make a full 12″ block.  You can see my ever present companion (Baja) below the table.

The Beginning...4 1/2" Squares Sewn Together

Sewing the blocks together and creating the main portion of the quilt.  Once these blocks come together, the quilt gets pretty large and a little hard to manage.  The key in getting the corners and lines to match up is pinning.  Yes, it pays off to pin things.  I used to skip this step, but would always regret it!  PIN IT!

Sewing Blocks Together

The addition of the personal touches like this high school letter is when the quilt design really started to take shape.  It is when the concept on paper and the reality of what is sitting in front of you starts to move into what looks right now that you can see it right in front of you.  I used a blanket stitch with green matching thread to stick the letter on the quilt top.

High School Letter

So, here’s my secret to getting the perfect letters.  It is probably not a secret to many, but I discovered it a few years ago when trying to figure out how to get perfect quilt letters.  I just use Microsoft Word to locate the type of font I want and the size.  I print out the letters that I want to use in the correct size.  I then use these letters to trace onto the fabric adhesive.  There are several different products out there to use:  Steam A Seam, Heat and Bond, Pellon, etc.  They all work well, but try different types out and use what you like the best.  Make sure it is two sided adhesive and not one sided.  Otherwise, you will be unhappy!

Font for Lettering - My Trick

Once the letters are all cut out and ready to go, I sew them on to the base fabric using my favorite blanket stitch with matching thread.  This is something that you will get better at over time.  One thing that you will want to play with is the size of the stitch and the tension in your bobbin.  If you see your thread from below peaking through, your tension is too tight.  I first attached these letters with a blanket stitch and then went back over the letters after the quilt was complete and washed with a decorative stitch.  It created a nice effect on the letters that allowed them to standout.  Oh, and make sure you change presser feet before you start the blanket stitch….or, you will break a needle.  Trust me…I know.  I broke two last weekend.
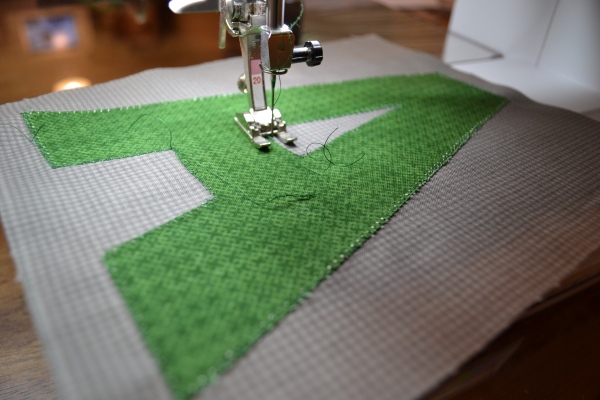
Sewing on the Letters

Here is the actual quilting in progress (after the back of the quilt and batting have been assembled with my preferred method of spray glue basting).  One of my favorite parts…the part that makes a quilt A QUILT!  I used just a meandering stipple pattern done freehand.  I drop the feed dogs, adjust the tension, change the foot and go for it.  Check the back of the quilt occasionally to make sure your tension is correct; you will have to adjust if you start sewing fast as it will pull a bit.  Just keep an eye on it and adjust as needed.

Quilting

Here is the final quilt.  You will notice that the stripes made it to the binding on the quilt.  I love the effect.  I debated whether adding another border, but liked this look so much that I kept it like this.  I quilted using a silver grey thread on front and a black thread on back.  The back of the quilt has a brushed cotton flannel which will be super cozy and warm.  I love to wash my quilts right after they are finished so that they shrink up, become cuddly and are nice and soft.  Also, if you have done some applique, you can check to make sure you don’t have any places where you need to go back and touch up.
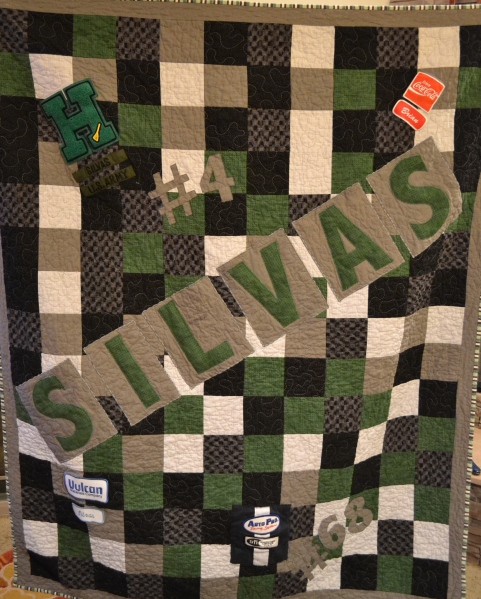
Quilt Front

Here is a close up of the letters.  Notice the decorative stitch that I used on the blocks that the letters sit on.  And, how the letters puff out a bit.  That is a result of coming back after washing the quilt and sewing around the letters a second time.  You can also notice how the quilt shrinks up and gets a little “wrinkly” after washed.  I like this look…

Quilt Detail...Lettering

Close up of the message on the back of the quilt…I should have gotten a better picture.  I had embroidered this on the back of the quilt with cotton thread.

Quilt Back - Message

I used left over binding to tie up the quilt into a perfect package.
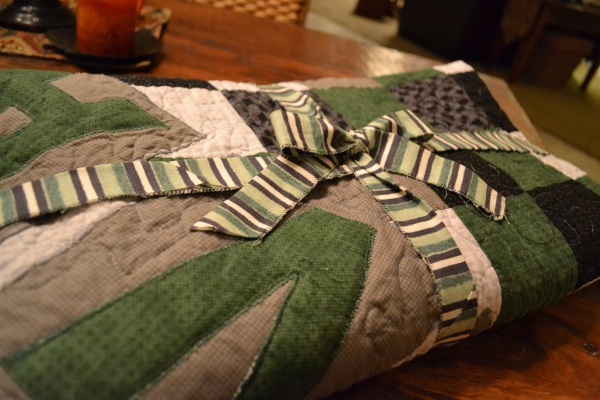
Quilt Package - Ready to Give

The quilt was delivered the next day and I hear that it was well received.  In fact, it was given a few days in advance to the birthday boy because they couldn’t wait!  Always, good to hear.

If you are interested in a custom quilt, go to my etsy page to see the options.

Happy Day!